Honey Cinnamon Apple Butter

Apple butter. Autumn-in-a-jar, honeyed-cinnamon apple butter.

jar of apple butter

jar of apple butter

apple butter recipe steps

apple butter recipe steps

white honey & cinnamon

white honey & cinnamon

Let the Edible DIYs continue with a way to put fall's bounty of apples to great use (though this isn't such a bad idea either). To make apple butter, the only necessary ingredient is apples. A lot of them (preferably). Anything else is superfluous - in a good or bad way, depending on what it is. Good = cinnamon, vanilla, honey or other natural flavorings. Bad = cups and cups of added sugar. So unnecessary.And it's a very low-effort recipe that produces wonderful results. In the simplest of terms:Apples cook down in a slow cooker/ crock pot for a few hours, get pureed in a blender and then cook down some more, transforming from applesauce (which is pretty tasty itself - who needs Motts?!) into a thick, smooth, lightly sweet-yet-tart deliciousness that is, in a word, lovely.As I said, this can just be made with apples and apples alone - whatever kind(s) you like - but I decided to add in a little cinnamon and some white honey.Any honey will do, but this Rare Hawaiian Organic White Honey is some special stuff. The best way I can describe it is if velvet were to be a taste and texture, it would be this honey. Ridiculous. Especially eaten off of a spoon. But, I digress...Read on and get the recipe (which is easily vegan - though to make it TRULY vegan, you'll want to omit the honey or replace it with perhaps agave) for Honey Cinnamon Apple Butter.Recipe: Honey Cinnamon Apple ButterWhat You Need

  • About 5 lbs of apples (I used a combination of granny smith and pink lady this time to get some tartness and sweetness)

  • 1/8-1/4 c honey

  • 1/4-1/2 tbsp cinnamon

  • a few squeezes of fresh lemon juice

What You Do

  • Core and slice apples into large chunks, and put into slow cooker/ crock pot; add a couple of squeezes of fresh lemon juice

  • Cook apples in slow cooker/ crock covered on high for about 3 hours, stirring every 15-30 min or so (it'll help prevent the apples from sticking at the bottom, and keep the heat distributing evenly; note that cooking time will vary depending on how hot your cooker is)

  • Once the apples are very soft and mash apart easily, transfer the mash into a high-speed blender or a food processor (depending on the size of your appliance, you may need to do this in several batches)

  • Puree the apples until smooth

  • Pour the pureed apple back into the slow cooker/ crock and stir in cinnamon and honey, to taste

  • Cook on medium, covered, for 3-5 hours or until it has reduced to a much thicker consistency; it'll be darker in color as well

  • Cool and save in jars or other air-tight containers in the fridge for a few weeks, or can to preserve even longer!

DIY Whole Grain Dijon Mustard

And now for DIY recipe numero uno.I lurve mustard. All kinds, and the spicier the better. The kind of spice/heat from mustard seeds is one of my favorites - similar to wasabi - I love that sinus-clearing, head rush of heat versus a mouth-scalding burn (which I used to not be able to tolerate at all, but have actually come to love flavorful hot peppers that do that too!). Grocery store chains and local markets usually have a great variety of mustards to buy, but when browsing the spice aisle of the new-ish Natural Grocers store here in Prescott, spotting yellow and brown mustard seeds at a crazy low price made a lightbulb go off over my head... make mustard from scratch!So simple, so worth it. This is a super basic recipe. So much so that I am not sure if this even meets true "recipe" qualifications - it's that minimalistic. I played around with ingredient ratios, and this seemed to balance out the best. The mustard is spiciest right after the preparation process is complete, and I know the spice factor can mellow out over time... but just wait and see if you can make the mustard last long enough to get to that point (we haven't). A good, grainy dijon mustard is such a great, multi-purpose kitchen staple - mix it into vinaigrettes, use it as a marinade, spread it on sandwiches, dip veggies and pretzels into it (highly recommend Trader Joe's pumpernickle variety) - you'll use it up in no time. Make some and keep it for yourself, and make extra to give as a gift for a mustard-loving pal.Homemade pretty much always wins, and certainly when it comes to a whole grain dijon mustard, homemade / DIY takes the cake!Recipe: DIY Whole Grain Dijon MustardWhat You Need:

  • 1/2 c dry white wine
  • 1/2 c good white wine vinegar
  • 1/4 c brown mustard seeds
  • 1/4 c yellow mustard seeds
  • a few grinds of black pepper
  • 1/2-1 tsp salt

What You Do:

  • Mix all ingredients in a small jar or bowl
  • Cover container with plastic wrap to seal
  • Let covered container sit on your counter (not in direct sunlight) for 2 days - you'll notice that the seeds will absorb the liquid
  • Pour mixture into a small food processor, and grind/blend to desired texture - leaving some grainy-ness is best!
  • Store in an airtight container in the refrigerator (I think it should keep for at least a few weeks)


Let Your Fruit Flag* Fly!

Speaking of World Vegetarian Day / Vegetarian Awareness Month - our afternoon yesterday was veggie-filled. We were fortunate enough to get an up close and personal tour of a local friend and Thai-restaurant-owner's home garden, which was pretty spectacular and gave us major plant envy. He was even so incredibly kind as to send us away with a very generous sample of some of his 14+ tomato varieties (many heirloom), as well as several Thai and other hot peppers, some Italian plums, concord grapes, an heirloom spinach, and more:

(*hence the title of this post... the way all of the produce looks in this photo from how we laid it out made me think of a flag!)

The yellow tomatoes in the center of the photo are particularly interesting - their skin is soft and a little fuzzy, like a peach - we'd never seen that before. The spinach was also really unique - we took a bite and could only describe it as "super spinach" - it's a thicker, denser spinach than the typical variety, with more flavor and substance. It was also my first time tasting a fresh concord grape... OH my. Absolutely and immediately one of my favorite fruits. Now, to try and grow some ourselves...And what's in this photo just touches on what his garden grows - there's also chard, apricots, blackberries, tons of herbs (Thai basil!), and lots more. It was very inspiring! We are in the process of planning how to improve and expand what we're growing at home.So naturally we had to put some of these amazing veggies to use for dinner last night. I threw together a variation on this Simple Summer Heirloom Tomato Fusilli.I used a few different tomatoes from the above photo, as well as some yellow grape tomatoes we already had. Heated a little olive oil and some leftover dry white wine (Berger - one of our favorite Gruners) in a pan, and tossed in a few tablespoons of chopped shallot and garlic. Oh but not just any garlic - elephant garlic!:Look at the size of it! I photographed it in my hand for a point of reference. I've never cooked with it before...  needless to say 3/4 of a clove goes a long way (and this is coming from a garlic lover). I haven't yet researched how it differs from regular garlic other than in size, but if I had to guess I'd say it might be a little milder.Once the garlic and shallots softened and became nice and aromatic, and the alcohol from the wine burned off, I added some lemon zest, lemon juice, a full bag of baby spinach, and the tomatoes. I also added some chopped jalapeno (from our garden) and some thinly sliced Thai chili pepper for a kick of heat, as well as a sprinkling of sea salt and a bunch of ground pepper. And a few handfuls of basil from our garden.For pasta, I used remnants from two boxes: a bit of our favorite long fusilli and and also a little gemelli. I tossed the pasta with the "sauce" once it was al dente, and then I added some fresh arugula to the bowls we ate out of for some crunch and additional veggie bulk. I love recipes like this, because it's barely a recipe at all - you just use what ingredients you have and go off of your own taste preferences, and throw something together. It was a great light dinner.

5-Bean Brown Rice & Pumpkin Seeds with Tamari

As I wrote in my last post, preparing some of your own food when traveling and staying in hotels is good for both your health and your wallet if you have the means to do so (aka have use of some basic kitchen appliances wherever you are staying). Plus, when in a foreign country, it gives you more excuses to browse the sometimes curious and sometimes wonderful and new-to-you items found on their store shelves (...orrr maybe that's just me?). So, first came smashed avocado toast, and now here's another simple yet satisfying concoction: mixed beans with brown rice, pumpkin seeds and soy. It consists of literally just 4 readily-available ingredients, is 100% vegan and also gluten-free.Interestingly, on a gluten-related note, New Zealand seems to be very gluten-conscious and it's extremely common for restaurant menus to indicate GF (gluten-free) options. From the little bit I've heard, it seems that gluten allergies/intolerance is quite common here. I'm curious to do some more digging into that and why it is so.But anyway - back to the recipe! I boiled some medium grain brown rice (read more about the benefits of brown rice vs rice here), cooled it a bit in the fridge, and then mixed in a 14 oz can of a five-bean mixture (rinsed & drained), some pumpkin seeds and some low-sodium tamari. Back into the fridge it went in a ziplock baggie, and we ate it as part of dinner one night and I had it for breakfast as well. Yes - a grain/bean/seed/veggie (though there were obviously no vegetables in this recipe) combo makes for a really great and nutritionally optimal way to start the day!I didn't have any measuring utensils to use, so I just eyeballed everything and taste-tested to get the right amount of tamari. You can definitely use a different rice/grain and any bean(s) you prefer, and use soy instead of tamari - just know that soy sauce is not gluten-free.This recipe was inspired by a friend of ours back home who has been a vegan for years and serves as a go-to source of nutrition-related info for people in her life. One challenge people on a plant-based diet sometimes face is preparing some interesting, tasty and nutritious food at home that can be taken on the go and doesn't need to be refrigerated all day to prevent spoiling. She pointed out that mixing a few ingredients, like what's in this recipe, can be preserved in the fridge for a longer time and also withstand a day without refrigeration because the tamari and its sodium content acts as a preservative of sorts. So it's a great meal or snack to have with you when you're traveling/ out and about, or - if you make it when at home - keep it in a container in your refrigerator separate from veggies, and then chop and add vegetables in as you want to eat it to help preserve freshness.Final thought - did you know that pumpkin seeds have LOTS of healthy benefits? They are the most alkaline-forming seed, are high in good quality protein, are loaded with important vitamins and minerals, can be an anti-inflammatory agent, and much much more. High in fat, yes, but good-for-you fat.  

Smashed Avocado Toast

We've been in New Zealand now for about two weeks, and it has been a wonderful adventure - with more still to come! It is a strikingly beautiful country along the coast and out in the countryside and I'm really excited to see more of that.We've had some really amazing meals, in the Auckland area and throughout our south island travels (more on all of that to come). But - when traveling for an extended period of time and being mainly at the mercy of dining out, the cost can start to add up - and NZ isn't cheap!Luckily, each hotel room we've stayed in has been equipped with a sink, basic cookware/dishes/utensils, 2-burner stove top, small fridge, toaster, electric kettle (one of my favorite appliances) and microwave/convection oven. So to be able to go to a local grocery store - which I happen to love doing in foreign countries anyway - and buy a few things to let us eat in for a few meals and snacks is a great cost-saving and healthy option.Exhibit A: Simple Smashed Avocado Toast (with some Mahala Red apple slices alongside)It's as easy as can be to make this, and is great morning, noon or night. I need to also mention that New Zealand avocados are particularly delicious!!Recipe: Simple Smashed Avocado ToastEnough for a full meal for 2What You Need

  • 2 ripe avocados, pitted and scooped into a bowl
  • 1-2 scallion stalks, sliced thinly
  • pinch of salt and ground pepper to taste
  • 2-3 small vine tomatoes (or equivalent amount of a different tomato), sliced thinly
  • Good bread of choice

What You Do

  • Mash up the avocado with a fork to a still-chunky consistency
  • Add the scallions, salt and pepper to avocado and mix/mash a bit more with the fork to combine
  • Toast your bread - we used a fresh baguette this time
  • Top the slices of bread with a scoop or two of the avocado mash, lay a couple of tomato slices on top of the avocado (or place the tomatoes on the toast first - whichever you prefer) and eat up! You can also sprinkle some sliced scallion on top of your compiled toast, if you like. Note in the photo above, we forgot to put the tomato... oops... so I can testify that it's delicious without the tomato, but I do prefer it with.

Note: You can definitely spruce this recipe up with additional seasonings and veggies, but the idea here is to keep it basic and simple for easy and quick cooking a la hotel room. Though I can guarantee it'll be just as tasty as is in the comfort of home as well :)See my next post for more on cooking while traveling!

Blanco Taco & Tequila

If you're traveling through the Phoenix Airport, find yourself in Terminal 2 and are hungry - check out Blanco Tacos & Tequila, which opened about 8 weeks ago in the Gate A wing. There's a counter for faster to-go ordering, or a sit-in restaurant if you have more time to kill - and as far as airport dining goes, we were extremely impressed with Blanco. The minimalist, modern decor made for a nice atmosphere (again, especially for an airport!), the beer (love Pacifico on tap!) and food selection were great and the servers were fantastic.We had a bit of time before our flight, so we sat at a proper table in the restaurant. Too often when explaining to a server that we want to order something meat and dairy-free, they either provide recommendations that still include animal-based items, or they and/or the kitchen don't pay attention to our request and we still find butter or cheese* on our plate. Not this time though - everyone working at Blanco that we encountered was extremely friendly and helpful - exceptionally so, really - in us finding some great things to eat. Unfortunately Blanco's guacamole has sour cream in it (which I realize isn't terribly uncommon in restaurants, but I still don't understand it - avocados are so creamy as is, who needs the sour cream added?! I assume it has to do with either preservation or cost, but even so..), so we were steered away from that and toward their REALLY good freshly made chips and some spicy salsa:I ordered the mushroom tacos, which are dairy-free as is, and our waitress suggested a veggie burrito to Peter that the kitchen often makes for customers wishing to eat something vegetarian and substantial. As burritos typically come in a flour tortilla though, our waitress and the kitchen staff went out of their way enough to find out the ingredients of the flour tortillas - which happened to include dairy - and let us know before our meals came, so that we could both opt for the soft corn tacos instead. My mushroom tacos with shredded cabbage and beans were delicious, as was Peter's deconstructed veggie burrito (corn shells were wrapped in the paper on the side). Mushrooms, squash, peppers and more, and seasoned black beans, abound on both plates:Contrary to what I've found many people to believe, Mexican cuisine is actually great for vegetarian and vegan eating. Not everything has to be smothered in cheese or gobs of sour cream (something I used to be guilty of doing!) - and particularly when good, fresh ingredients are used, you can better appreciate the vegetables, beans, spices, etc. when you don't have to dig them out from under a mountain of cheese. It's hard to go wrong with a plate or taco full of good veggies, beans and some rice, though we didn't have rice at Blanco. Clean eating when traveling is particularly helpful in keeping your body - energy, immunity, GI system, and all - feeling good, and airport food can make that tricky at times. Not so with Blanco!We almost always fly US Airways, we were both really enthused to discover this great eatery in our home airport (PHX) terminal - it's great to have a clean, tasty food option that will be convenient for future travels, either when we're rushed and need to grab something to go or have the time to sit in the restaurant (and take advantage of the great service at Blanco!).A very positive airport dining experience to start off our journey to New Zealand!*(Yes I do once in a while still eat cheese - I just choose not to for health reasons 98% of the time - but when I do have it, I want it to be really worth it... more on that in upcoming NZ food posts!) 

Eating in Prescott: Bill's Pizza

You already know my thoughts on Bill's Grill. Now I must rave for a moment about Bill's Pizza (and yes, both places are owned by the same person).Everyone has their own specifications as to what constitutes a great pizza, but even with something as seemingly basic and common as pizza - we can all probably agree that we've encountered some lousy versions. It's not so hard to mess it up - soggy dough, overly sweet or acidic sauce, poor quality of toppings, etc. Bill's Pizza couldn't be farther from that though - everything is fresh, and prepared and cooked to perfection. The pizza is REALLY fantastic. Really really. And not just for here - for anywhere.We tend to order a large when we go, knowing it will last the two of us for two meals, with the "add 7 toppings" menu option, and the restaurant is kind enough to add an 8th topping since we get the pizza without cheese (which I swear you don't even notice is missing with so many great vegetables on top). They also have a gluten-free crust option, but not in the large pizza size.Here was yesterday's: a thin, crunchy crust (my favorite kind) that held up well beneath mushrooms, zucchini, artichoke hearts, jalapenos, kalamata olives, green olives, green chilies and plenty of fresh spinach (and bonus points for it being added raw to the otherwise cooked pizza):Easily the best pizza around - I have yet to encounter another place nearby that can rival the freshness and quality of the ingredients and finished pizzas here. Plus it's locally owned, and we all need to support local businesses - wherever you live!

Tomato, Green Olive & Spinach Dip

On a recent trip to Costco (with enough hunting around, there are indeed organic and clean-ingredient products to be found there!), there was a sale on Baba Foods hummus. We tasted and enjoyed many and bought three: sun-dried tomato and basil, spicy black bean, and garlic and artichoke. YUM. A nice way to switch things up with typical store-bought hummus flavors.Wanting something on the lighter side for dinner last night - and having these three tubs of hummus to go through - I figured I'd try and add some veggies to bulk the hummus up in a healthy way. What I wound up with is one of those "refrigerator/pantry recipes" - where I didn't plan ahead at all, but instead took a look at what ingredients were already in our kitchen and picked out a few that sounded like a good combination. With some fresh veggies, garlic, a touch of olive oil and a food processor, you really can't go wrong mixing together just about any combination of ingredients! And it takes all of 5 minutes. Quick, delicious andsuper healthy. Gotta love the food processor (I used a mini one) as a time saver!After preparing the tomato, olive and spinach dip, I thought it would go well with the sun-dried tomato and basil hummus. So into a bowl went the hummus, and I made a little well in the center into which I scooped the dip. We ate it by dipping in griddle pan-warmed za'atar pita (by Kermanig Bakery - another recent and great Costco find) slices.This dip works well on its own, and did exactly what I was hoping for in terms of bulking up the hummus with some quality, healthy veggies. In combination with the hummus, it's a nutritionally well-balanced dish - great for a snack, appetizer or light meal.Recipe: Tomato, Olive & Spinach DipNote: I didn't measure exact amounts when making this, but it shouldn't be a problem, as slight variations on the ratio of ingredients won't have a negative impact!What You Need

  • 1 c cherry/grape tomatoes (any color)
  • 10 medium green pimento olives
  • 1 c loosely packed spinach
  • 1/2 garlic clove
  • pinch sea salt (or any other salt will do)
  • a few grinds of fresh black pepper
  • 1/2 tbsp olive oil, divided in half
  • 5 large basil leaves (optional)
  • 1-in chunk of a fresh jalapeno (optional)

What You Do

  • Add garlic to food processor and pulse to chop
  • Add tomatoes and pulse to chop
  • Add all other ingredients (minus 1/4 tbsp olive oil) and pulse, chopping to desired consistency
  • Scoop into desired serving dish - over hummus or by itself - and drizzle the remaining olive oil over the top
  • Serve with warmed pita or whatever you want to dip in it, and enjoy!


Eating in Prescott: Bill's Grill

There are a few solid places to get a good burger in Prescott, but fewer worthy veggie burgers at the local restaurants. PBC has had my favorite version, but the still relatively new Bill's Grill is giving it a run for its money! We've been frequenting Bill's Grill since it opened; it has quickly become a local go-to for us.Top five favorite things about Bill's Grill, in no particular order:

  1. There are THREE veggie burger options! Only one (the Boca burger) is vegan, but the black bean chipotle patty is dairy-free (not vegan because of a small amount of egg present) and delicious. I tend to go for that one; it is very flavorful and the texture is perfect.
  2. Aside from pre-selected burger concoctions you can order, the menu features a "build your own" system which has tons of toppings to choose from for your burger. Onion straws, crimini mushrooms, avocado and pepperocini/banana peppers get my vote! And, the barbeque and buffalo sauces are great. Those toppings, a black bean burger and a multigrain bun are my standard order:
  3. Three words: sweet potato fries. Enough said.
  4. If you're opting for meat, Bill's Grill offers locally raised beef - a great, clean option!
  5. The selection of craft beers on draght is fantastic. I especially recommend the Breckenridge Vanilla Porter, a brew from Colorado. It's easily one of my absolute favorite beers.

I have yet to try a beef burger there, but hear only great things. Bill's Grill also has seafood options (seared Ahi tuna, and recently salmon as well) and bakes their own buns (including a multigrain and a recently added gluten free bun) - bonus points for that.They also have daily/weekly specials - including red meat, chicken, seafood and/or veggie-centric options - and deserve creative props for thinking outside of the box. On a recent lunch date there with friends, one decided to go for the special at the time - the "Luther Vandross" - which included bacon, cheese and doughnuts in place of a regular bun. I did not try it, but E. who ordered it did enjoy it!:I really admire and appreciate what Bill's Grill is putting out there. They're all about good food made with fresh ingredients, offer tremendous variety to keep customers interested, and aren't overly expensive. I like the fact that they have plenty of healthier offerings as well as some off-the-wall indulgences - there's something for everyone!

How to Juice Wheatgrass Without a Juicer

I spotted a small container of wheatgrass - which I love - amidst sprouts and herbs at New Frontiers recently, and curiosity got the better of me so I grabbed it to try preparing the juice at home for the first time. I initially thought we'd use the juicer, but another experiment with that machine recently left enough to be desired that I decided to instead tackle the wheatgrass with a blender and fine mesh strainer.Turns out you don't need a fancy juicer or special wheatgrass juicer to make your own wheatgrass shots; a high powered blender will do the trick as well. Granted I did have to use a little water, so the juice was a little more diluted than usual, but it still had its trademark refreshing, sweetly grassy taste.How to Juice Wheatgrass Without a JuicerThe container of wheatgrass I bought was about 5 x 5 inches and filled with rooted wheat grass. I cut the green grass portion off and put it into my blender (a Blendtec). I then added  few ounces of cold water - enough to just cover the flat part of the blender blades. I pressed the juice setting button, and let the Blendtec go to town! Once it was done, I placed a small fine mesh strainer/sieve over a Pyrex measuring cup (you can replace this with just about any cup or bowl) and poured the juiced wheatgrass through the strainer, using a spoon to press down and extract as much liquid as possible. Very little was left in the strainer aside from a bit of thin pulp and some foam. I then poured the wheatgrass juice into two small glasses (see photo - that's a teaspoon in front of the mini glass to help show how small the glass is), and we drank away!As I said, the addition of water to this makes for a wheatgrass juice not quite as concentrated as what an actual juicer would produce, but that didn't bother us; it was a very enjoyable and delicious morning treat to have this at home!Why wheatgrass? Read more about the potent benefits of this powerful detoxifier at the Hippocrates Institute.

Nutritional Yeast Vegan "Cheese" Sauce

Creaminess is texture not found consistently or very frequently in vegan eating due to the absence of dairy. The most common vegan sources of something creamy are probably avocado, soaked and blended nuts, non-dairy milks and butter substitutes, and tofu. But certainly when cheese is removed from the picture, you need to get a little more creative to bring back a creamy texture to your plate.I made vegan mac & "cheese" a while back, the base of which was Daiya "cheddar", and was extremely pleasantly surprised with how great it turned out both in favor and mouth-feel - though Daiya gets most of the credit for creating a product that melts and imitates real cheese so closely.I've been reading a lot about nutritional yeast though, and my curiosity to make something in which that was the main ingredient finally got the best of me. I made this nutritional yeast sauce over the weekend and similar to my vegan mac & cheese, I was yet again taken aback by how well this creation turned out.On a slight digression... I've seen nutritional yeast referred to as "nooch" on many online resources... and maybe since "nutritional yeast" is a lot (I guess?) to say/type over and over, I can begin to understand a shortened nickname... but even so, I just can't get on board with calling it nooch. No judgement, but I prefer the whole name or an initial abbreviation (NY?)!Nutritional yeast is an interesting and versatile ingredient. I've been using Bragg brand, which is vegan, gluten-free, non-GMO and sugar-free. And, not only does it taste great in many recipes, nutritional yeast has some noteworthy nutritional value, particularly for a vegan source. Most of all it's a tremendous source of B vitamins - thiamine (B1), riboflavin (B2), niacin (B3), pantothenic acid (B5), pyridoxine (B6), biotin (B7), folic acid (B9), cobalamin (B12) - as well as other vitamins like selenium, 18 amino acids, and minerals such as zinc and iron. (On yet another quick digression, I've been thinking a lot lately about how we are constantly told to "take our vitamins", but sometimes the benefits and specific importance of each gets lost in translation. So, stay tuned for a post on the breakdown of important vitamins and minerals!).This nutritional yeast cheesey sauce is easy to whip up in no time, and is so tasty: it's very creamy, rich, salty and tangy. It's also very versatile: eat is as is and dip in your favorite chips or crudite, pour it over raw or cooked veggies or grains, or add in some diced tomatoes, olives, peppers or herbs for a new twist.Click through for the recipe!Recipe: Nutritional Yeast "Cheese" SauceWhat You Need

  • 1/4 c nutritional yeast 
  • 1 tsp salt
  • a few grinds of fresh black pepper
  • 1/4 c flour (brown rice or other gluten-free blend, or all purpose unbleached flour)
  • 3/4 tsp garlic powder
  • 1/2 tsp mustard powder
  • 1 c water
  • 1 1/2 tbsp Earth Balance (or other vegan butter substitute)
  • dried cayenne (optional)

What You Do

  • Mix all of the dry ingredients in a small saucepan
  • Slowly whisk in the water, whisking until all clumps are gone
  • Add Earth Balance and put the saucepan over medium heat, whisking frequently until it begins to bubble and thicken
  • Remove from heat and taste in case you need to adjust any seasoning
  • Add a pinch or two of cayenne for some heat, or chopped veggies for a heartier dip/sauce
  • Leftovers should keep for a couple of days in an airtight container in the refrigerator - but my guess is you'll rarely have any leftovers to save when you make this!

 Save

Recipe: Ultimate Vegan Brownies

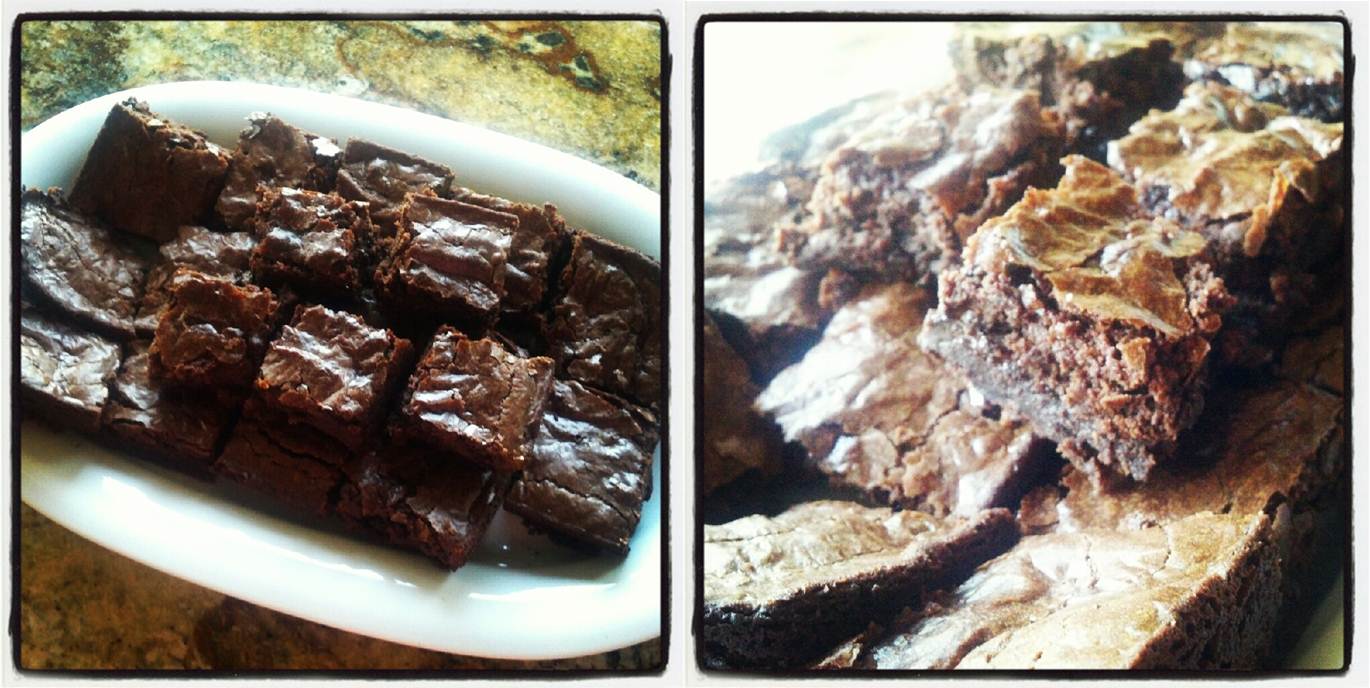
As far as vegan baking goes, this was one of the times when if I did a blind taste test, I would absolutely fail at guessing that what I was eating was vegan. These brownies have all of my favorite typical brownie qualities - chewy and fudgey but not too heavy, firm around the edges, very moist, very chocolatey and with a light and thin crust on top.The absence of dairy and eggs (or even an egg substitute, for that matter) is not noticeable. My only comment - can't call it a criticism since it didn't end up being a negative - is that when these were still warm and I started cutting the baked brownies, I had to be careful to not let the pieces separate. I attribute this mainly to the fact that I should have let them cool longer before slicing, but also because there is no egg or other real binding agent in the recipe. But in the end, it didn't matter and I wouldn't go about trying to add something else.These vegan brownies are by no means "healthy" - but at least if you're going to eat a brownie, you're doing your body a bit of a favor by not having dairy/eggs present. And I also like that there are no ingredients atypical of brownies present... which isn't to0 say recipes out there using non-dairy milk, tofu, alternative binding or levenaging agents, etc. aren't great, but it's nice that everything in here is pretty standard as far as brownies go.I've always had success with brownie recipes that include coffee, and a combination of real melted chocolate and cocoa powder, and this was no exception. The taste, texture and consistency of these vegan brownies leave me thinking I won't ever make them with dairy again. Hope you like them as much as I and my taste testers did!!(Click through for the recipe!)Recipe: Ultimate Vegan Brownies*Adapted from this recipe (just the brownie portion)What You Need:

  • 2/3 cup brewed coffee
  • 1 tbsp Earth Balance (or other non-dairy butter substitite; coconut oil should work as well)
  • 3 oz dark chocolate** pieces
  • 2 3/4 c sugar (I used a combination of white and turbinado)
  • 1 cup unsweetened cocoa powder
  • 1 1/2 tsp salt
  • 2/3 c coconut oil (in liquid form), plus a little extra for greasing the pan
  • 2/3 c water
  • 1/2 tbsp vanilla bean paste
  • 2 c all purpose flour
  • 1 tsp baking powder
  • 3/4-1 c dark chocolate chips

What You Do:

  • Preheat oven to 350 degrees, and lightly grease a 9x13 baking dish with a thin coating of coconut oil.
  • In a double boiler over simmering water (or a small saucepan over low heat), melt the dark chocolate, Earth Balance and coffee - stir frequently until all are thoroughly combined and smooth. Set aside.
  • Combine sugar, cocoa powder and salt in the bowl of a stand mixer fitted with the paddle attachment***, and mix to combine.
  • Add oil, water and vanilla and mix to combine. Then mix in melted chocolate/coffee.
  • In a small bowl, whisk flour, baking powder and chocolate chips; add in thirds to wet ingredients, mixing a few seconds after each addition.
  • When all ingredients are just combined, pour the batter (which will be shiny and delicious!) into the prepared baking pan.
  • Bake on the middle rack for about 40 minutes, or until a toothpick comes out just clean.
  • Let cool in the pan for an hour or two before cutting and removing.
  • Eat as is, with coconut milk ice cream, with an ice cold glass of coconut milk, or however you please! Store in an airtight container, and then freeze what/if you don't finish within 3 days.

NOTES:*This recipe is according to sea level needs. I live at about 5000 feet though, so the adjustments I made were to increase the oven temp to 375 degrees and reduce the baking powder to 3/4 tsp.**Not all dark or bittersweet chocolate is dairy-free. Check the ingredient label before you buy and make sure no milk products are present.***You can also use a hand-held mixer, or get a good workout and mix with your best trusty wooden spoon!